
TABLE OF CONTENTS
- The Identifier Manager
- The Identifier Manager: Customize a View
- The Identifier Manager: Optional: Break Out By
- The Identifier Manager: Your Default and Saved Views
The Identifier Manager
You can easily find and review Identifiers within your Type 3 Associations by using the Identifier Manager.
Here’s how:
- On the left, in your Mission Control, select Groups.
Find the section called Manage Groups and use the drop-down to choose the group you’d like to work on.
- On the next page, you will see two methods for searching and finding Identifiers for the Group you have selected:
- Use the searchable alpha-numeric range to filter Identifiers by their first letter or number.

- Use the filter search Attribute to find the Identifier(s) you need to review.

- Use the searchable alpha-numeric range to filter Identifiers by their first letter or number.
- Click on the Identifier to access their profile.
- To make changes to the Identifier, open any panel and use the Edit button.
- To access survey data for the Identifier, open the Survey Data panel and click the View Data link.

The Identifier Manager: Customize a View
There may be times when you will need to see Identifiers and additional information on-screen. To this you’ll use the Customize a View feature.
Here’s how to access it:
- On the left, in your Mission Control, click Groups.
- Find the section called Manage Groups and use the drop-down menu to choose the Groups you’d like to review.
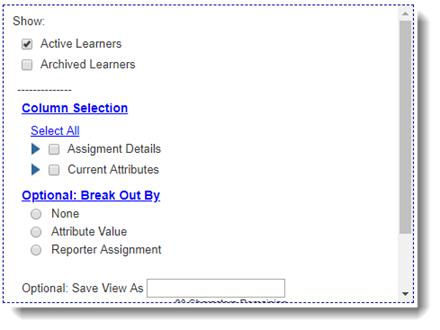
- On this page, select the Customize a View radio button.
- You can limit your view if Identifiers so you only see Active or Archived by choosing:
- Active Identifiers, or
- Archived Identifiers
- Active Identifiers, or
- Use the Column Selection link to reveal and select the Attributes to include in the table.
- These are your Panel. Open them to reveal your Attributes.
- Optionally, you can save your view by giving it a name. You’ll find your saved views just above the Customize a View section.
- Once selecting all of the Attributes you would like to include in your view, click View.
The Identifier Manager: Optional: Break Out By
- On the left, in your Mission Control, select Groups.
- Find the section called Manage Groups and use the drop-down menu to choose the Groups you’d like to review.
- Select Customize a View.
- Click the Optional: Break Out By link.
- From here you can create break outs based on Field Value or Reporter Assignment.
- You can also save your view to be recalled later in the Your Default and Saved Views section at the top of this page.
The Identifier Manager: Your Default and Saved Views
- On the left, in your Mission Control, select Groups.
Find the section called Manage Groups and use the drop-down menu to choose the Group you’d like to review.
- At the top of the page, you’ll see a section called Your Default and Saved Views. This section will contain a list of all of the customized views that you’ve created. You will not have access to the views that other admin reporters create.

- The Default View displays the name and status of each of you’re the identifiers available from your account.
EXTREMELY IMPORTANT: Your Impact Suite's lead administrator has automatic access to all identifier accounts.

All other admin have access to all identifiers who are not assigned to a site and all identifiers who are assigned to the same sites that the admin reporter at issue is assigned to.
Was this article helpful?
That’s Great!
Thank you for your feedback
Sorry! We couldn't be helpful
Thank you for your feedback
Feedback sent
We appreciate your effort and will try to fix the article