
TABLE OF CONTENTS
- Overview
- Admin Role Permissions Needed to Save Selections and Export Options
- Access the Association Data Export
- Step 1: What would you like to do?
- Step 2: Select an Association that has Survey Data
- Step 3: Select Association Items that have Data
- Step 4: Select a Date Range
- Step 5: Select Data to Include
- Step 6: Export Options
- Matrix TrueView
- Raw Data
- Saved Selections
- Use a Saved Export Option
- Included Worksheets
Overview
With Associations Data export, you can:
- See all your data for each association item in a single Excel workbook;
- Save your selected data selections and export preferences;
- Share those saved options with others on your team;
- Review data by question (comparing responses over time); and
- Review data by period (seeing data in the order it was collected for each period).

Admin Role Permissions Needed to Save Selections and Export Options
In order to save report selections and export options, admins will need a role with the permission, "Create, Edit, and Delete Saved Report and Export Format Options for All Admin."
Update admin roles that need this ability by following these steps:
- On the left, in your Mission Control, click Reporters, Admins, & Sites.
- On the right, under Manage Admins, click Manage admin roles.
- Find the admin role you need to update and click the Edit link.
- When the window opens, scroll to the section called Survey Management & Data Access.
- Admins who will be able to save selections and export options will need to have the permission "Access and View All Report Data" AND the new permission "Create, Edit, and Delete Saved Report and Export Format Options for All Admin."

- Click Update to save your changes.
Access the Association Data Export
1. On the left, in your Mission Control, click Survey Data.
2. On the right, under Additional Reports, click Association Data.
Step 1: What would you like to do?
In this step choose to export data or view data on-screen.

- Choose Export Data to Excel.
- To move to the next step, click Set.
(Need to View Data on-screen? Check out this article.)
Step 2: Select an Association that has Survey Data
In this step, choose the Association to include in the export.

- Select an Association.
- Click Set to save your selections.
Step 3: Select Association Items that have Data
In this step, select the Association items to include in the export.

- Select at least 1 Association item.
- Click Set to save your selections.
Step 4: Select a Date Range
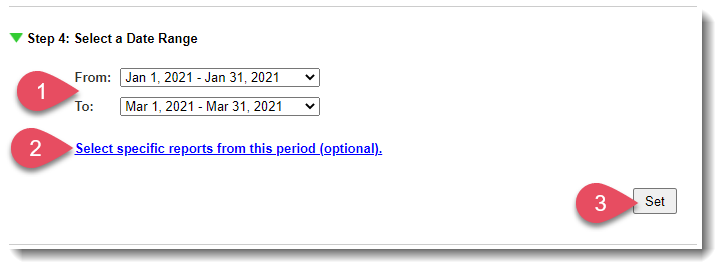
- Use the drop-down menus to select your start (From) and end dates (To).
- If you need to export data from specific reports during a given period of time, enter that time in the To and From menus, and then select the specific reports by clicking Select specific reports from this period (optional).
- To move to the next step, click Set.
Step 5: Select Data to Include
Here's where you'll select the specific data points to include.

- Options
- All Data: Includes all data for each of the reports you selected.
- Saved Selections: Includes a saved, customized selection of data. (See: Saved Selections below.)
- Customize: Choose individual data points.
When you customize the data to include, you’ll see an option at the bottom to save your selection, like this:
- All Data: Includes all data for each of the reports you selected.
- Click Set to save your selections.
Step 6: Export Options
Here's where you'll tell the application how to format your data in the spreadsheet. You can use pre-formatted templates, export raw data, or select a saved option that someone in your organization has already created.

- Options:
- Use a Saved Export Option: Includes previously-saved formats, if any. (See Optional: Save this Export Option As below.)
- Customize: Pick and choose from the available worksheets and options.
- Pre-formatted Worksheets: (See Pre-formatted Sheets below.)
- Totals
- Association Items as Rows
- Association Items as Rows (Broken out by Site)
- Association Items as Columns
- Association Items as Columns (Broken out by Site)
- Totals by Question
- Association Items as Rows
- Association Items as Rows (Broken out by Site)
- Totals by Period
- Association Items as Rows
- Association Items as Rows (Broken out by Site)
- Matrix TrueView
- Raw Data
- Totals
- Pre-formatted Worksheets: (See Pre-formatted Sheets below.)
- Use a Saved Export Option: Includes previously-saved formats, if any. (See Optional: Save this Export Option As below.)
- Click Set to save your selections.
- Once each step has a green check-mark, click Export to Excel.
- A window will appear showing you the progress of the export.
 Keep the window open until the file is ready, or close the window and wait for a download link to show up via e-mail.
Matrix TrueView
Matrix TrueView worksheets present matrix data as it was entered by your reporters.
Each Matrix question included in your selected data will create it's own worksheet.
Raw Data
For Raw Report Data, select which metadata to include from the Available Columns table (see this article for definitions of each column variable), using the down arrow to place each column type in the Selected Columns table.
In the Selected Columns table, on the right, use the up/down buttons to set the order in which the columns will be displayed in your export file.
***Use the checkbox to Include quantitative & time series data with zero values.
Saved Selections
[You must have the correct admin role permissions to perform these actions.]
The Saved Selections option allows you to decide which admins will have access to the selection (Just you, All admins with access to this section, You and admins by role).
Additionally, you can make Saved Selections available in other report types: Site, Program-wide, Association, and Group Reports.
Use a Saved Export Option
[You must have the correct admin role permissions to perform these actions.]
The Save this export option as section allows you decide who these options should be available to (Just you; All admins with access to this section, or You and admins by role).
Additionally, you can make Saved Export Options available in other reports: Site, Program-wide, Association, and Group Reports.
Included Worksheets
A Legend, which includes definitions of each worksheet type.

Was this article helpful?
That’s Great!
Thank you for your feedback
Sorry! We couldn't be helpful
Thank you for your feedback
Feedback sent
We appreciate your effort and will try to fix the article