
TABLE OF CONTENTS
- Enroll Participants Using Excel (En Masse)
- Video Support: Extra Help with Excel
- Step 1: Open and Download the Template
- Walkthrough for Step 2: Import Your Participants
- Step 2: Import Your Participants
Enroll Participants Using Excel (En Masse)
Here you'll learn how to create accounts for your Participants en masse by importing our Excel template. You'll start by downloading the Google Drive template to Excel, learn how to complete and prepare the file for upload, and then upload your participants into the Impact Suite.
Video Support: Extra Help with Excel
Step 1: Open and Download the Template
First, you'll download the template from Google Drive as an Excel file.
- Open the Youth Service Corps Participant Enrollment Template.
- Download the template to Excel.

- Open the Excel document and enter data for each column. Here is a table to help you with completing the worksheet.


- IMPORTANT: Clean the sheet:
- Delete any extra rows with data.
- Delete the worksheet called 'Delete Me.'
- Please save your Excel worksheet to your device.
Walkthrough for Step 2: Import Your Participants
Step 2: Import Your Participants
To enroll your participants, follow these steps:
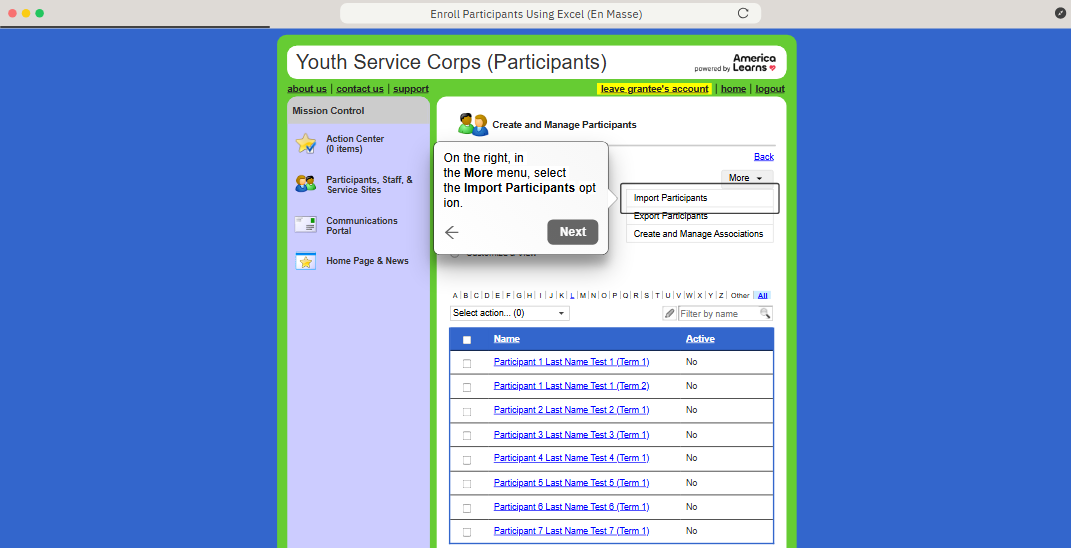
- On the left, in your Mission Control, click Participants, Staff, & Service Sites.
- On the right, click Manage participant accounts.
- On the right, in the More menu, select the Import Participants option.
- At the top of the page, under Step 1, select Add New Participants.

- In Step 2, select your file by clicking the Choose File button.
- In Step 3, click Upload Excel File.
- Next, map your fields to the fields available in your Impact Suite. (You will need to map the *Last Name field.)

- Once you have mapped your fields, click the Preview Import button to move to the next step.
Note: if there are Excel columns or Impact Suite fields that you have not mapped, you will get a message like this from the system:
- If no errors are found, skip to #10. (Check out this article on Common Import Errors for more help.)
If errors are found on the Excel sheet, you’ll get a detailed list of issues and the option to download the file you uploaded with the errors highlighted in red for quick correction. Here’s what the file will look like, with errors highlighted in red:
- Use this section to upload your corrected template:

- Next, you will re-map your fields (if needed).
Check out this article on Common Import Errors for more help.
- Use this section to upload your corrected template:
- When no errors are found, you will have a chance to Preview Import.
 This is a good opportunity to make sure you have properly mapped your template. If you find issues, you can use the Map Fields back button to correct any mistakes.
 - Next, click Perform Import to finalize your enrollment.
- Once complete, you'll get a message like this one.
To send an email to new Participants prompting them to set up their passwords, click the link Send the password setup e-mail to all newly-enrolled participants.
 IMPORTANT: Links to set up passwords expire 24 hours after delivery.
If you want like to send this email at a later date, checkout this article.
Was this article helpful?
That’s Great!
Thank you for your feedback
Sorry! We couldn't be helpful
Thank you for your feedback
Feedback sent
We appreciate your effort and will try to fix the article