
(Financial Reporting for Commission Admin)
TABLE OF CONTENTS
How to Get There
- On the left, click Financial Reporting.
- On the right, click Create and manage program years.
- Under Manage Existing Program Years, use the drop-down menu to select your program year and click Open.
- Scroll to the Included Programs section and finish updating and setting up your programs.
Enter Details for Each Program
This is where you’ll add programs to the program year. Be sure you’ve already enrolled programs to your Impact Suite (here’s the guidance).
To add your first program, click Assign Programs.
Or, if you've already at least one program, you can add new programs at any time by clicking the Edit Assignments link.

Set Up Programs
After enrolling programs, click each program’s corresponding Start Setting Up link. You will do this for each program in your Program Year.
A pop-up window will be displayed where you’ll be prompted to enter details for the program. These details are divided into five sections:

Start Setting Up Sections | Keynotes |
Contact Details | - Enter the program's address.
|
Grant Details | 
Grant Period (Required)
To make setup faster, you can copy Grant Details from another program or program year to this one by selecting the program from the drop-down menu.
By default, the grant period will be set to the same dates as your program year; however, if the program at issue will only be active for a limited amount of time and will only need to submit expense reports for that time, enter that period here. This way, the program won’t be prompted to submit reports for a period when they’re not active.
Project Name (Optional)
Enter the name of the program’s project.
Prime Federal Code (Required)
Select the program’s code for this program year. The codes in this drop-down menu come from the list of codes you’ve already created.
Commission Contract or Grant Number (Optional)
The contract or grant number your commission assigned to this grant.
Employer Identification Number (EIN) (Optional)
The program’s EIN.
DUNS Number (Optional)
The program’s DUNS number.
Grant Type (Required)
Select the grant type, and then enter the requested information, all of which is required. The information will help populate specific fields on budgets, reports, and other forms that the platform will generate.
See this article on definitions of Grant Types and options therein.
|
Responsible Reporters | 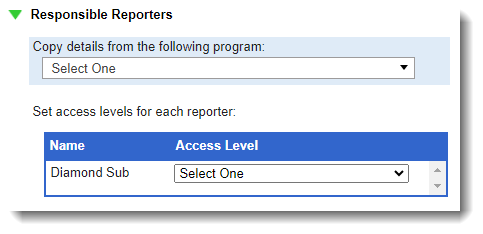 - To make setup faster, you can copy Responsible Reporters from another program year to this one by selecting the program from the drop-down menu.
- If you’ve already enrolled admin for this program, you’ll see a list of these folks. Use the drop-down menu to select which program staff will have read/write or read-only access to the program’s financial reports.
|
Reporting Schedule & Details | 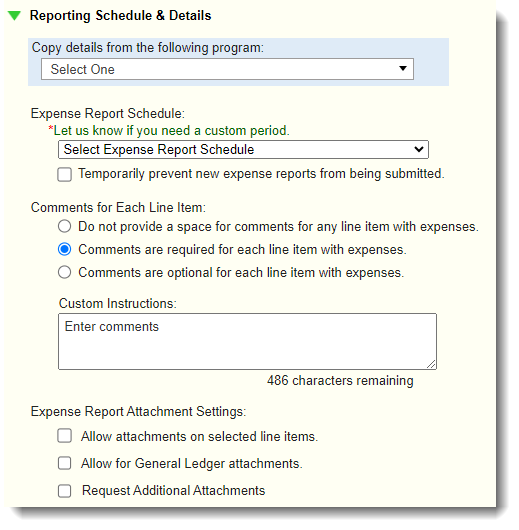
- To make setup faster, you can copy Reporting Schedule & Details from another program or program year to this one by selecting the program from the drop-down menu.
- Or, set the program’s Expense Report Schedule.
- To give you ultimate flexibility, you can put each program on a separate expense report schedule.
For example, if one program is deemed high risk, you can have them submit expense reports every two weeks versus monthly. Likewise, you can put lower-risk programs on an every-other-month schedule. You can change schedules for any program at any point during the year. When you change schedules, the schedule change will impact only unsubmitted expense reports.
- Here are the default scheduling options (if you need a custom schedule created, just let us know):
- 1st - 15th; 15th - last day of the month
- Monthly
- Every-other-month
- Every three months
- Next, decide how you will handle Comments for Each Line Item and, if needed, create Custom Instructions.
 - Lastly, update Expense Report Attachment Settings.

- To allow receipts or other attachments on select line items, click Allow attachments on selected line items.
For each line item, select whether no attachments will be allowed, whether they'll be optional, or whether they'll be required.
For optional and required attachments, you'll be prompted to customize instructions for that specific line item.
IMPORTANT CONSIDERATION #1: You can change receipt attachment settings for any program anytime. So, for example, if a program moves from a higher-risk to a lower-risk status, you can adjust receipt attachment requirements from being required to optional (or having none at all) at any time.
Note that changes you make instantly impact all unsubmitted and returned expense reports.
IMPORTANT CONSIDERATION #2: Some programs do not have formal systems for maintaining receipt copies. Those programs might appreciate being able to upload all of their receipts during the year so they can have everything in one place. You might want to give programs an option to enable this feature if you don't need it for monitoring purposes.
- Next, decide whether you'll prompt the program to attach a copy of their general ledger.
- To allow for general ledger attachments, click Allow for General Ledger attachments.
- You'll then be prompted to note whether attachments will be required or optional for the program, and to enter instructions for the attachments.
- Note that changes you make instantly impact all unsubmitted and returned expense reports.
- Finally, decide if you would like to Request Additional Attachments.
You can create an unlimited number of custom additional attachments to assign to the program. Since these attachments are customized for each program, if you have high risk or grant types that require additional documentation, you'll be able to ask for these items here.
After selecting the checkbox next to Request Additional Attachments, a pop-up window will appear.
 Use the links to Edit or Delete requests. Use the links to Edit or Delete requests.
To add more requests, click Create Another Attachment Type.
|
Budget Modification Customizations | 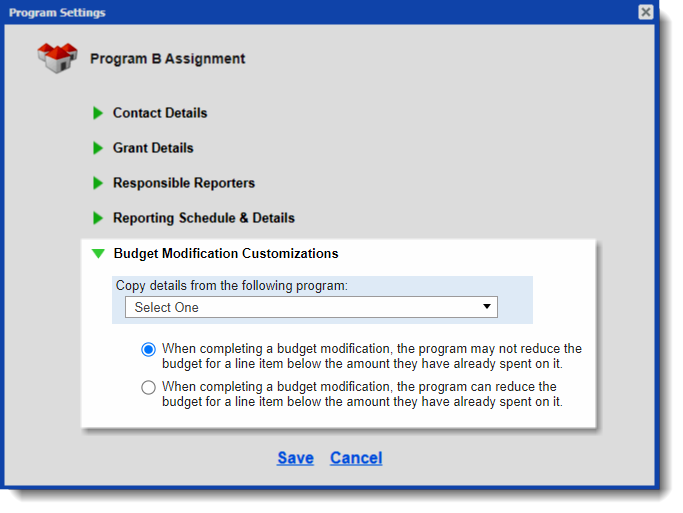
- To make setup faster, you can copy Budget Modification Customizations from another program or program year to this one by selecting the program from the drop-down menu.
- To finalize your Program Settings, decide if programs can reduce the budget for a line item below the amount they have spent.
Click Save to complete the Program Settings for this program. |
Video Resource: Adding a Space for Receipt Uploads for Programs