
TABLE OF CONTENTS
- Should I Use Blackout Periods or Personal Start and End Dates?
- Creating Mass Blackout Dates for Reporters
- Creating Blackout Dates for Individual Reporters
Should I Use Blackout Periods or Personal Start and End Dates?
After you assign a Timesheet Template to a reporter, you’ll have an option of creating personal start and personal end dates as well as additional blackout dates for their service term. Personal start and end dates create automatic blackout periods for your reporter at the beginning and/or end of their service term.
You'll want to update a reporter's personal start, personal end, and blackout dates under the following conditions:
If the reporter is beginning to serve after the Start Date of your Template, you'll want to update their Personal Start Date so that the reporter is not prompted to retroactively fill out sheets for the time when they were not in the program.
If the reporter will not be serving with you through your Template’s End Date, you'll want to update their Personal End Date so that the reporter is never prompted to submit sheets after their term of service ends.
If you know the reporter will not be serving for a week or more in the middle of their service term, we also encourage you to create additional blackout dates for that period so that the reporter does not have to submit timesheets unnecessarily.
IMPORTANT: Blackout periods influence when reporters are prompted to submit timesheets.
If any timesheet period (ex. weekly, biweekly, monthly, etc) from your template has an overlapping blackout date for the entire timesheet period, the reporter at issue will not be prompted to submit a timesheet during that time.
If any timesheet period from your template has an overlapping blackout date for part of the timesheet period, the reporter at issue will only be prompted to report time on days from that sheet that have not been blacked out.
Creating Mass Blackout Dates for Reporters
IMPORTANT: Auto-blackout dates created by Personal Start and End Dates assigned to reporters CANNOT be added or removed using the method described below. To learn more about Personal Start and End Dates, check out this article: personal start and end dates: automatic blackout periods

In order to update Personal Start and End Dates for reporters en masse, we recommend using the Import Reporters feature. For instructions on importing reporters, check out this article: enrolling reporters en masse using Excel
Here’s how to add and remove blackout periods from two or more Reporters simultaneously:
- On the left, in your Mission Control, click Reporters, Admins, & Sites.
- On the right, click Manage reporter accounts.
- On the right, use the More menu to select Mass-Update Blackout Dates.
- The next page will walk you through the four steps to setting up or removing a blackout period.
Step 1: Select the Timesheet Template at issue.
Step 2: Tell the Impact Suite if you are adding or removing a period from Reporters’ accounts.
Step 3: Set your blackout period’s start and end dates.
Step 4: Click Display all relevant Reporters below to choose which Reporters’ accounts should be updated.
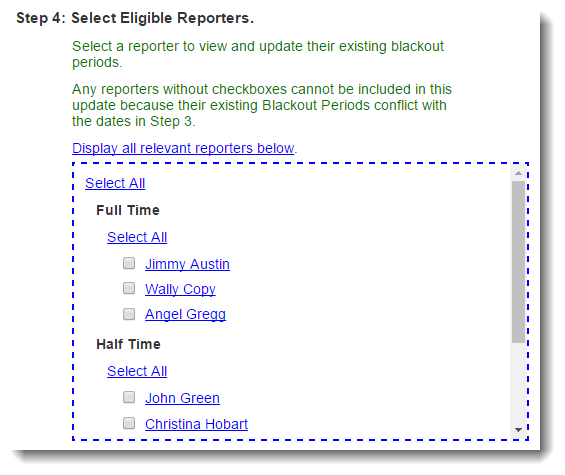 You’ll see that each Reporter’s name is hyperlinked. Click that link to see and make modifications to that person’s current settings.
- Once you click the Update Selected Reporters button at the bottom of Step 4, you’ll be asked to review and confirm your selection. If everything looks good, follow the prompts to update the selected accounts.
- On the following page, you’ll see a confirmation of which Reporters’ accounts were updated.
Step 1: Select the Timesheet Template at issue.
Step 2: Tell the Impact Suite if you are adding or removing a period from Reporters’ accounts.
Step 3: Set your blackout period’s start and end dates.
Step 4: Click Display all relevant Reporters below to choose which Reporters’ accounts should be updated.
You’ll see that each Reporter’s name is hyperlinked. Click that link to see and make modifications to that person’s current settings.Creating Blackout Dates for Individual Reporters
On the left, in your Mission Control, click Reporters, Admins, & Sites.
On the right, click Manage reporter accounts.
Click on the name of the reporter you would like to update.
Find the Timesheets Settings panel like the one in the following image:

To make changes to this panel, click the Edit button. In the pop-up window that opens click Edit blackout dates

You'll see the Blackout Dates section displayed, that may look something like this:

These are the auto blackout periods created by making adjustments to the reporter's Personal Start and Personal End dates. If you need to make adjustments to these periods, Close this section and make the update to these sections instead:

- Otherwise, you can select Create Another Period to create a new blackout period.
NOTE: You can enter up to 20 total blackout periods per reporter
- Don't forget to click the Update button to save your changes.
Was this article helpful?
That’s Great!
Thank you for your feedback
Sorry! We couldn't be helpful
Thank you for your feedback
Feedback sent
We appreciate your effort and will try to fix the article