
TABLE OF CONTENTS
- Walkthrough
- Video Resource: Admin Roles and One-by-One Enrollment
- Enrolling New Admin One-by-One (without Umbrellas)
- Enrolling New Admin One-by-One (with Umbrellas)
- Video Resource: Create a Password
- Enrolling New Admins En Masse using Excel
Walkthrough
Video Resource: Admin Roles and One-by-One Enrollment
Enrolling New Admin One-by-One (without Umbrellas)
To enroll admins:
- On the left, in your Mission Control, click Reporters, Admins, & Sites.
- On the right, click Manage admin accounts.
- On the top, select Add a New Admin Account.
- Enter the person’s details:

- a) Notes on Site Assignments:
There are three options when assigning sites:- Assign to all active sites at all times. (This person will be assigned to all currently active and all newly enrolled sites automatically.)
- Assign to all active & deactivated sites at all times. (This person will be assigned to all sites regardless of status and will be automatically assigned to all new sites as they are enrolled.)
- Custom (This person will be assigned to a custom selection of sites.)
- b) Send the password setup e-mail now.
If you would like the person to receive an e-mail with instructions for setting up their password and account right away, leave the checkbox selected (Send the password setup e-mail now).
Otherwise, uncheck the box and follow the instructions in step 6 below.
- a) Notes on Site Assignments:
- Click Add.
- If you opted to send the setup e-mail later, when you’re ready to send it find them in the table at the bottom of the page, checking the box next to their name.

Then use the Select Action drop-down menu to Send Welcome/Password Setup E-mail to Selected Without Passwords (N).
Or, you can use the option to Send Welcome/Password Setup E-mail to All Without Passwords (N).
One more option (of course): Click the link to send the welcome e-mail right from a person’s profile.
Learn how to opt folks out of receiving Communications Portal messages here.
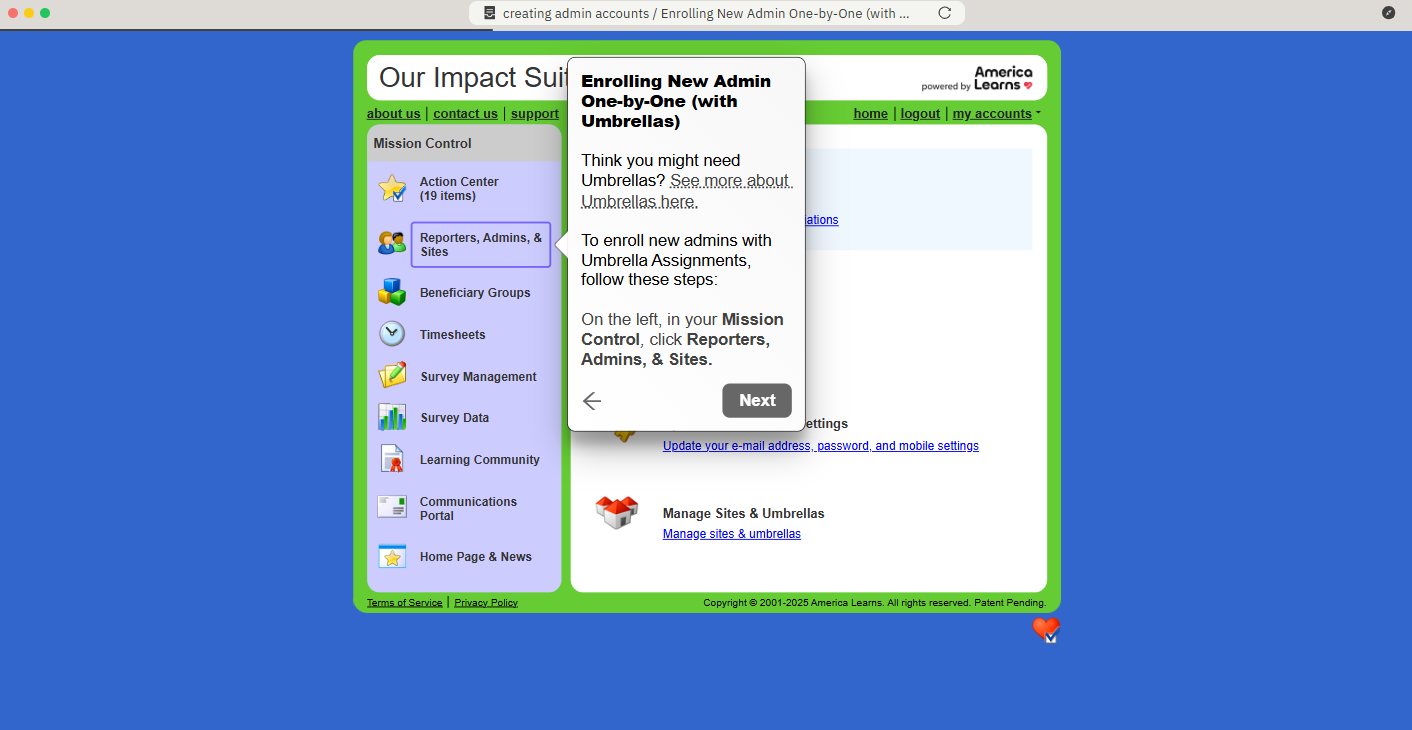
Enrolling New Admin One-by-One (with Umbrellas)
Think you might need Umbrellas? See more about Umbrellas here.
To enroll new admins with Umbrella Assignments, follow these steps:
- On the left, in your Mission Control, click Reporters, Admins, & Sites.
- On the right, click Manage admin accounts.
- On the top, select Add a New Admin Account.
- Enter the person’s details:

- a) Notes on Umbrella Assignments:
NOTE: The word "Umbrella" is a generic term and your program likely uses a different word: Campus, State, Program, etc.
There are three options when assigning Umbrellas:- Assign to all active umbrella at all times. (This person will be assigned to all currently active and all newly enrolled Umbrellas automatically.)
- Assign to all active & deactivated umbrella at all times. (This person will be assigned to all Umbrellas regardless of status and will be automatically assigned to all new Umbrellas as they are enrolled.)
- Custom (This person will be assigned to a custom selection of Umbrellas.)
- b) Notes on Site Assignments:
There are three options when assigning sites:- Assign to all active sites for their selected umbrella. (This person will be assigned to all currently active and all newly enrolled sites automatically.)
- Assign to all active & deactivated sites for their selected umbrella. (This person will be assigned to all sites regardless of status and will be automatically assigned to all new sites as they are enrolled.)
- Custom (This person will be assigned to a custom list of sites.)
- c) Send the password setup e-mail now.
If you would like the person to receive an e-mail with instructions for setting up their password and account right away, leave the checkbox selected (Send the password setup e-mail now).
Otherwise, uncheck the box and follow the instructions in step 6 below.
- a) Notes on Umbrella Assignments:
- Click Add.
- If you opted to send the setup e-mail later, when you’re ready to send it find them in the table at the bottom of the page, checking the box next to their name.

Then use the Select Action drop-down menu to Send Welcome/Password Setup E-mail to Selected Without Passwords (N).
Or, you can use the option to Send Welcome/Password Setup E-mail to All Without Passwords (N).
One more option (of course): Click the link to send the welcome e-mail right from a person’s profile.
Learn how to opt folks out of receiving Communications Portal messages here.
Video Resource: Create a Password
Enrolling New Admins En Masse using Excel
Follow these steps to enroll new admins using Excel:
- On the left, in your Mission Control, click Reporters, Admins, & Sites.
- On the right, click Manage admin accounts.
- On the right, in the More menu, select Import Admins link.

- You can use your own Excel document or create a custom template.
- Map your fields before proceeding.

- Preview Import.
- Click Skip and Import.
- Perform Import.
Create a Custom Template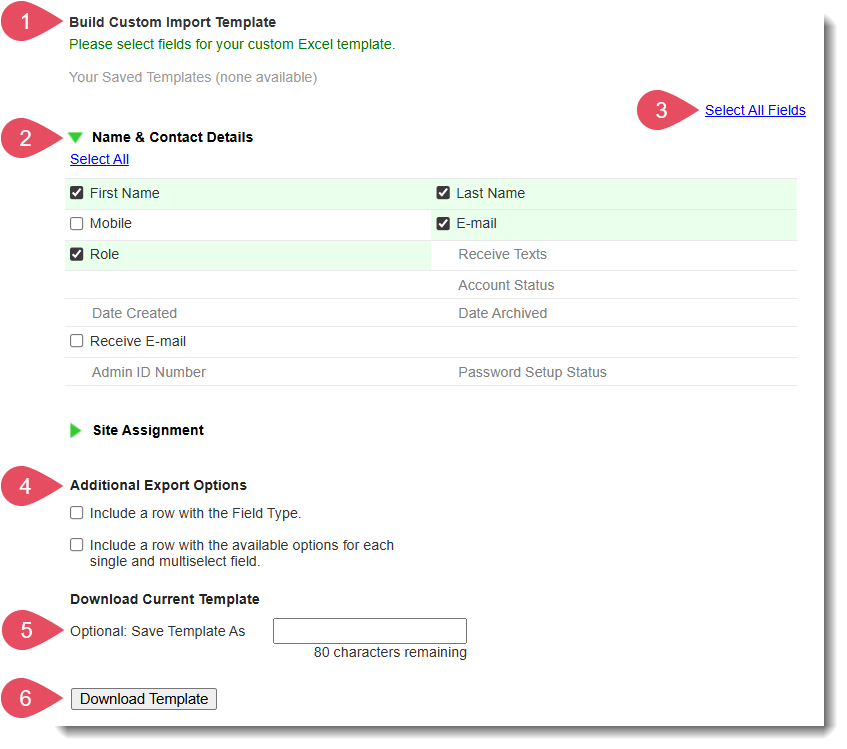
- Find the section called Build Custom Import Template.
- Open your panels to choose the fields you’d like included in your custom template, or
- Use the Select All Fields option on the right.
Note: At a minimum, in the Name & Contact Details panel, you must include First Name, Last Name, Email, and Role. - Additional Export Options.
To make importing admins as simple as possible, we've included a way for you to export the Field Type (for each field) and the available options for any single-and-multi-select fields you include in your template.
IMPORTANT: If included, delete these rows before you import your file. - (Optional) Save Template As.
To save your template for later use, use the Save Template As section to give it a name. - Click Download Template.
REMINDER:
Excel Worksheet Anatomy

Was this article helpful?
That’s Great!
Thank you for your feedback
Sorry! We couldn't be helpful
Thank you for your feedback
Feedback sent
We appreciate your effort and will try to fix the article