
TABLE OF CONTENTS
- Video Support: Reporter Management
- Accessing the Reporter Manager
- The Reporter Manager: Customize a View
- Viewing Reporters by Last Name
- The Reporter Manager: Optional: Break Out By
- The Reporter Manager: Default and Saved Views
- Show Profiles That Need To Be Reviewed
Video Support: Reporter Management
Accessing the Reporter Manager
On the left, in your Mission Control, select Reporters, Admins, & Sites.
On the right, select Manage reporter accounts.
When the page is displayed, you’ll see a roster of all of your currently-enrolled reporters.

Click the name of a reporter to access their profile.
The Reporter Manager: Customize a View
Customizing a View
On the left, in your Mission Control, select Reporters, Admins, & Sites.
On the right, select Manage reporter accounts.
At the top of the page, you’ll see a section called Customize a View.
Use the Show section to select a specific umbrella of your reporters.

Use the Column Selection link to determine which columns you’d like to see.

Click the Optional: Break Out By link to have the table sort reporters by:
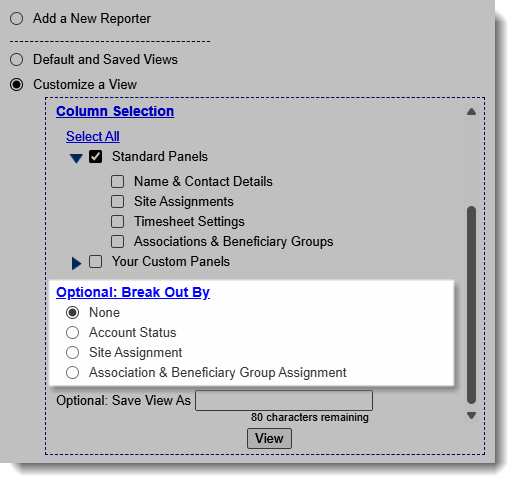
- Account Status
- Site Assignment
- Associations & Group Identifier Assignment
To Save View As for easy access later on in the “Default and Saved Views” section, please enter a name for it in the text field at the bottom of this box.

Click View to display the table and to (if applicable) save the view.
Viewing Reporters by Last Name
Above the table that displays your reporters’ names, you’ll see letters of the alphabet.

To display reporters whose last name begins with a specific letter, select the relevant letter.
To reset the view to display all reporters, select the “All” link to the right of the letters.
The Reporter Manager: Optional: Break Out By
- On the left, in your Mission Control, select Reporters, Admins, & Sites
- On the right, select Manage reporter accounts.
- Select Customize a View.
- Click the Optional: Break Out By link.
- From here you can create break outs based on Account Status, Site Assignment or Association & Group Assignment.
- You can also save your view to be recalled later in the Default and Saved Views section at the top of this page.
The Reporter Manager: Default and Saved Views
Accessing Default and Saved Views
On the left, in your Mission Control, select Reporters, Admins, & Sites.
On the right, select Manage reporter accounts.
At the top of the page, you’ll see a section called Default and Saved Views. This section will contain a list of all of the customized views that you’ve created. You will not have access to the views that other admin members create.

The Default View displays the name and activation status of each of your currently-enrolled reporters.
IMPORTANT: Your Impact Suite's lead administrator has automatic access to all reporter accounts.

All other admins have access to all reporters who are not assigned to a site and all reporters who are assigned to the same sites that the reporter at issue is assigned to.
Show Profiles That Need To Be Reviewed
To see reporters with fields that need your attention, follow these steps:
On the left, in your Mission Control, select Reporters, Admins, & Sites.
On the right, select Manage reporter accounts.
Next to the Filter by name click the Pencil Icon.

To return to seeing all reporters, click the Pencil Icon once more.

Was this article helpful?
That’s Great!
Thank you for your feedback
Sorry! We couldn't be helpful
Thank you for your feedback
Feedback sent
We appreciate your effort and will try to fix the article